Search Results

Sunday, February 28, 2010

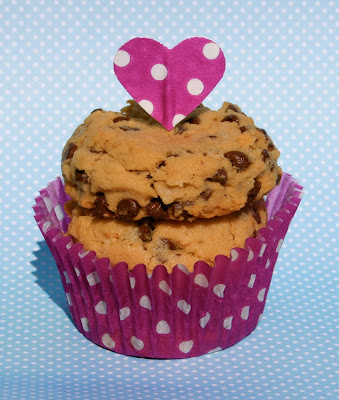
PB-O-Coco Cookies

Or at least that's what I'm calling them!

They are also known as "Peanut Butter, Chocolate Chip, Oatmeal Cookies," but personally, I think PB-O-Coco has a little more pizazz.

I've never really been a fan of peanut butter cookies. Which is ironic because it's my personal belief that peanut butter can make just about anything better...especially a spoon and my mouth.

So when I saw the pictures from Brown-Eyed Baker, I thought I might have a hit. When these first came out of the oven, I had my obligatory taste. And, I hate to say it, I wasn't impressed. They seemed a little crumbly and bland, but I figured they weren't bad and would work.

...but I spoke too soon.

Maybe it was all the cookie dough testing, or the fact that they just came out of the over, but a few hours later, after they had a chance to rest, I tried another - you know just to make sure.

It was great!
Soft, with a little bit of chewy, good chocolate to peanut butter ratio, and moist.
Highly recommended.

The Recipe
(copied from Brown-Eyed Baker)

1 cup all-purpose flour
1 teaspoon baking soda
¼ teaspoon salt
1 stick (½ cup) unsalted butter, at room temperature
½ cup creamy peanut butter
½ cup granulated sugar
1/3 cup light brown sugar
½ teaspoon vanilla extract
1 egg
½ cup rolled oats
1 cup semisweet chocolate chips

Directions

1. Preheat oven to 350 degrees F. Line two baking sheets with parchment paper and set aside.

2. Whisk together the flour, baking soda and salt; set aside.

3. On medium speed, cream together the butter, peanut butter, granulated sugar, brown sugar and vanilla extract, about 3 minutes. Add the egg and beat to combine. On low speed, gradually add the flour until just combined. Stir in the oats, and then the chocolate chips.

4. Use a large cookie scoop (3 tablespoons) and drop dough onto prepared baking sheets about 2 inches apart. Bake for 10 minutes, or until the cookies are lightly golden. Cool completely on the baking sheet and then store in an airtight container at room temperature.


To make the toothpick/topper. I used a heart punch and the same cupcake wrapper. The wrapper was a little hard to punch, so I cut off the bottom, double-stick taped it to white paper, then punched the two pieces of paper. I punched a second white heart and double-stick taped a toothpick between the white layer and the purple layer.

Too cute!

Saturday, February 27, 2010

Inspiration Overload

Let me introduce you to my new favorite website:


If you're familiar with foodgawker or craftgawker, it's a similar format. People upload pictures of fabulous (in this case) wedding ideas. It's brand new so there are only a few pages of submissions so far, but I'm willing to bet that photos and links will be flooding in! For example, foodgawker has 1118 pages and craft gawker has 267 to date.

Anyone can submit an idea. All you need is a quality photo and a link to the site. I'm not sure they even have to be your photos (as long as you give appropriate credit - boo to copyright infringement!)

Or you can just sit back and click, click, click, and find pages of inspiring ideas!


Friday, February 26, 2010

DIY Custom Chocolate Bars

Thinking about custom chocolate bars as favors?
(the thought did cross my mind)

Thought about making them yourself?
(well, duh!)

Check out my step-by-step how to on WedLoft by Wedding Window!


Tuesday, February 23, 2010

Everything's Going to be Alright!

I must confess.

Although I really love my ideas and am thoroughly committed to my "every shade of blue" theme, I've started to get a little nervous.

What if they clash?
What if no one gets it?
What if my vendors go color blind and think that periwinkle, aqua, indigo, and Pantone 662 C are all the same?
What if Papa Smurf sees the wedding photos and emails me regarding decorations for Smurfette's Super Sweet Sixteen?

Well, I'm taking a deep breath and enjoying this post from Style Me Pretty.


Elizabeth and Peter put together a gorgeous wedding using everything from light blue to cornflower, to royal blue to navy. And each element flows from one to the next with no clashing. Even the blue sky blended in perfectly!

I particularly love the table and banner combination.


The best part...no smurfs in site!

Monday, February 22, 2010

Second-Best Chocolate Chip Cookies Ever!

It pains me a little bit to refer to these as the "second-best" chocolate chip cookie, but my heart goes out to the classic Tollhouse recipe. That will always be my #1, but these....


come pretty gosh-darn-diddly close.

Introducing one of my favorite chocolate chip cookies, the "Best Big Fat Chewy Chocolate Chip Cookie"

I've been making these for years and they always make a great impression. They've got that bakery storefront appeal.


Let's start with the basics of what makes this cookie amazing.
1. Size

Most cookies recipes say "drop by tablespoon" onto cookie sheet. This recipe?
Drop by 1/4 cup.
Dude.

Look out behind you!

2. They're soft and chewy.
mmmmm....chewy.


3. They're super easy!

The Recipe

2 cups all-purpose flour
1/2 teaspoon baking soda
1/2 teaspoon salt
3/4 cup unsalted butter, melted
1 cup packed brown sugar
1/2 cup white sugar
1 tablespoon vanilla extract
1 egg
1 egg yolk
2 cups semisweet chocolate chips

Directions

1. Preheat the oven to 325 degrees F (165 degrees C). Grease cookie sheets or line with parchment paper.

2. Sift together the flour, baking soda and salt; set aside.

3. In a medium bowl, cream together the melted butter, brown sugar and white sugar until well blended. Beat in the vanilla, egg, and egg yolk until light and creamy.

4. Mix in the sifted ingredients until just blended. Stir in the chocolate chips by hand using a wooden spoon. Drop cookie dough 1/4 cup at a time onto the prepared cookie sheets. Cookies should be about 3 inches apart.

5. Bake for 15 to 17 minutes in the preheated oven, or until the edges are lightly toasted. Cool on baking sheets for a few minutes before transferring to wire racks to cool completely.

6. Prepare to bask in the cookie-loving admiration of friends and co-workers.


Enjoy!

Sunday, February 21, 2010

DIY Calligraphy - Addressing Envelopes

For someone who's so fabulously artistic, I have terrible handwriting. Not only do I have terrible handwriting, I make typos. I didn't even know you could make typos while handwriting, but I miss letters or they run together all the time. It's not that I don't know how to spell the word (usually), but someone that doesn't translate on paper very well. And, even when I get the words spelled correctly, I'm lucky if anyone else can interpret them.

So, when it came to my wedding invitation envelopes, I was left with a dilemma. What was the best way to address them? I figured I had a couple options:

1. Be traditional and handwrite the addresses, drop them off at the post office, and, like a mother dropping her kids off at school for the first time, wave at my little darlings, cry softly, and whisper, "Godspeed little doodles" in the hopes that the post office would be able to read my chicken scratch.

2. Buy labels and *gasp* computer print them. Well that might work, just don't tell grandma.

3. Pay a calligrapher to write each one with a gorgeous sweeping, elegant, style that I can only dream of...Hmm...let's see. $2.00 x 150 invitations = how much were labels again?

4. Run the envelopes through my computer printer! Oh wait, the haste of a 20% Paper Source sale, I already purchased 200 A7 envelopes in "night." And, unless HP has come out with the best printer since sliced bread (i.e., can print light ink on dark paper), that's not going to work.

What's a DIY-er to do?
and then...I found the solution!

Look, I did these myself!

Was it calligraphy class?
Bribing a relative with good handwriting?
Surgically transplanting my hand with Laura Hooper?

Nope!
It was...Wedding Bee and the AMAZINGLY clever Jennifer.

Ok, here's the secret: tracing (shhh...don't tell)

Start by computer printing the address in a color similar to the color or your envelope.

Can you see that?
What about this one?


It is hard to see, but with the right light, and some patience, it's not so bad.

Templates and printer settings will vary from computer/printer to computer/printer, but I can tell you that I used Adobe Illustrator to make sure everything was lined up correctly, changed my printer settings to "5.25 x 7.25" and "envelope" and just ran them through one at a time. I did have to copy/paste each address into Illustrator, but I got into a rhythm and it went pretty quickly. (Plus, I've computer-printed addresses for wedding invitation clients in the past, so I'm kind of use to it by now).

Then I used a Uni-Ball Singo broad white gel pen and just traced! The ink wasn't perfect, and I had to trace a few lines over as I wrote, but overall, I think the one's I've completed came out gorgeous!


They have a wonderful handmade quality, but I didn't have to pay a lot or risk people knowing what my actual handwriting looks like.

A couple vintage stamps to complete the look... and ta-da!

So I still have a lot more to do, but at least it's progress, right?

Saturday, February 20, 2010

Hair-brained

I live in ponytails. That's it. And, after years of hearing "Get that hair out of your pretty face." (thanks, Grandma), having hair in my face drives me crazy. And, let's be honest, I like to sleep in. There is no such thing as a hair dryer in my morning routine.

Now, that doesn't mean that I don't like when my hair is all done up, but after years of not styling it, I really don't know what to do or how to do it. But I am totally looking forward to having someone who actually knows what they're doing, make me look all fancy like :).

I've already made the hair piece.


So here's what I'm thinking:

(photo credit: Nothing but Bonfires)

and I like the looseness of this one

(photo credit: The Knot)

and I like the height of this one:

(photo credit: comicpie)

I love this one too - wish I had a photo from the front, but It looks so romantic.

(photo credit: damned_cat)

But, this is probably my favorite. I especially like that it was for a wedding, so it's got a little more modern feel. Although, I think I might be interested in something less curly in back. Maybe we can combine this one with the above.


(photo credit: Carriephotos.com)

I'm picturing the flower either centered in back or off to one side and a veil tucked under the bun-thing in back. I'll probably do I a trial run in March, so we'll see what happens :).

Blog Widget by LinkWithin

ShareThis