Search Results

Showing posts with label handmade. Show all posts

Sunday, April 3, 2011

Corina's Cute Wedding

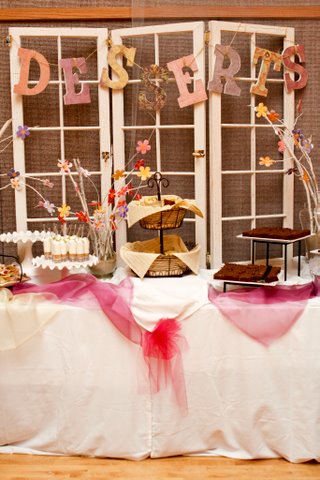
Last week, Corina emailed me some adorable photos from her DIY wedding. 


She handmade all her centerpieces from branches and paper flowers (just like yours truly)


I love how she used so many bright colors. Everything looks so fresh and festive!


I also love how she used them to decorate her dessert table!


Great job Corina and congrats!!

All photos by Jessie Pyne
(UPDATE: Jessie emailed me with a link - check her out!)

Thursday, February 17, 2011

Cookie Stands in Action

Thanks to a little D*Sponge linkage, my DIY cookie stands are probably the most popular of my posts. So how did they turn out?

Adorable...if I do say so myself.


We also screen printed bags so people could load up on the 1,200 cookies my mom, my mother-in-law, and I made.


My cousin, taking her share.

To make the bags, I bought these (p.s. Uline is my secret weapon, they have everything) and Gocco'd a monogram that I designed in Illustrator. A round computer-printed label would work just as well if you don't want to screen print them.

And here's the cookie stand tutorial, if you missed it.


Some cookies never made it into the bags.


But a few did. :)


The reception hall was amazing, we dropped everything of a couple days before and they had the whole table set up perfectly when we arrived.


Mmmm...oreo cookie cookies.
OK so I just went to grab a link and apparently, I haven't posted this recipe yet. I'll have to get on that.


There's no real recipe for these PB cup cookies, just a couple steps: 

1. Scoop store-bought peanut butter cookie dough into a greased mini muffin tin. 
2. Bake as directed 
3. As soon as they come out of the oven, stick a mini reeses cup in the middle.
4. Curse the day that PB first met chocolate and put on your "buffet pants."


I don't even know what these are.
They might be PB-O-Cocos, but they look rounder. 
Whatever, they were gone by 10:00 anyway.


The boy loves pinwheels.
These are from that Cookie Companion book over there on the right ---------->;
(scroll up a little bit)
Not enough decadence for my taste though.
But what can you do? I'm married to him now :)

All photos by The Observatory

Tuesday, February 8, 2011

Please be Seated

While I can't remember where I came across the idea, the moment I saw someone use years for table numbers, I knew I was done searching. 


We scoured through boxes and photo albums and frames and so on for the best photos of us from each year. It was so much fun picking out who would sit at which year.


Our parents, of course, got the early years (when we were cutest) and our friends got "the awkward years." Although, thoughtfully, our photographers didn't take any "awkward years" photos. Which is probably a good thing since no one wants more of those photos floating around.

Well, maybe one embarrassing photo slipped in there...


And, of course, everything was handmade.

I spent a couple months collecting frames from Goodwill stores near my house and spray painted them white. 

Each photo was scanned, resized, printed and cut to the appropriate size. I also printed and cut out each year.

I then mounted them to scrapbook paper and put them in the frame.

I would say it cost about $6 per table number.

Then we had to think about the seating chart. It seemed perfectly logical to me that since we were doing years, a timeline would be the perfect display option.


We ended up having three timeline boards set up on easels in the reception lobby where people could find their names and take their seats.


To make the boards, I purchased three 3/4-inch form board from the craft store and covered it with fabric using double-stick tape and flat tacks on the back.  

I then took blue ribbon and ran it across the center, fastening on back with double-stick tape and flat tacks.

The years were again printed out on my computer, cut out, and taped to the ribbon with more double-stick tape.

I used permanent marker to draw lines up and down from each year, making sure everything was evenly spaced, and that there was enough room to display all the names.

Each name card/banner was printed on my home computer, cut out, and tacked to the board using blue and white round tacks.  

I also added some extra paper flowers from the centerpieces to fill in a few gaps.

It's hard to say how much the seating chart cost because I had the fabric and ribbon, but I know I picked both up on clearance. So maybe $5 for the fabric, $1 for the ribbon, $3 for the tacks and tape...so maybe $10 for all three? 


We also needed a way to let the waiters know who ordered what.


So we added Paper Source menu stamps to the back of each banner as well as a reminder of the table number. 

I bet you can guess who the two people having steak at Table 2010 were. :)


Saturday, January 29, 2011

Our Wedding Tree

One of the things I had the hardest time trying to figure out was the guestbook. It wasn't that I didn't have any ideas... it's that I had too many. We eventually decided to go with a wedding tree.

(photo credit Jonas Peterson)

But I didn't think people would want to dirty-up their fingers, so I had another idea!

(photo credit The Observatory)


We made a poster, cut out a bunch of leaves, and asked people to "leaf" us a note! 


(photo credit The Observatory)

It was a big hit!

(photo credit The Observatory)

And now it's framed in our living room.


So how'd we do it?
Pretty simple really.

I purchased some clip art from istockphoto.com
Created a 24"-36"-sized document in Adobe Illustrator and added some text.
(fonts used: BlairMdITC TT Medium and Burgess Script)
Took the file to Staples and had it printed on a poster.
(I think it was about $25)

Then I picked up a pack of cardstock in various shades of blue and cut out leaves. No pattern, just freehand. I added a small piece of double-stick tape to the back of each. I made sure to use those little scrapbook tape squares so that the tape wouldn't be exposed, but would have a little tab of paper that guests could pull off when they were ready to add their leaf to the poster.

The venue had an easel and put the poster up outside the reception hall and set up a table with the leaves and various blue markers.

And all our guests started writing sweet notes!


See the big "I love you"? That's from my husband's cousin (aka the little boy in the photo above). Too cute!

However, the best one is from Jay's Grandma/our friend "Kennedy." 
I guess that, because his signature was so light, she didn't see it.


Bless your heart, Grandma. :)

Tuesday, January 18, 2011

Things I've Seen that I Like

I've never been into making inspiration boards (except for one). 

I can either never find what I'm looking for. Or I lose interest around page 6 of my search results. Or there are so many good ones out there - just search Google images for "wedding inspiration board [insert color here]" - why should I make another?


I mean seriously, look at all this gorgeous inspiration...I can get lots of inspiration just handed to me :)

However, I do see things I like, like all the time. And I want to share them with people, like all the time. So instead of inspiration boards, how about I just post things I like? I make no promises of them matching or falling into a similar theme, or even making sense or that matter :) And all you have to do is sit back and enjoy.

Deal?
Great!

First, the only thing I love more than DIY is DIY using recycled materials. 
Like these gorgeous and delicate flowers made from vintage sewing patterns by MontclairMade on Etsy:


And I know I made no promises about things coordinating, but wouldn't they go perfectly with this Vera Wang dress?


And maybe pair it with this adorable and simple necklace from ANORIGINALJEWELRY on Etsy.


You can flip the necklace from "Ms." to "Mrs." after the ceremony!
I (because I'm a giant dinosaur nerd) also love these (hey husband, hint, hint) tiny dinosaur earrings.

Speaking of dinosaur nerds...
I definitely debating having our wedding at the Smithsonian Natural History Museum.


But A) not everyone is as much of a nerd as I am; and B) the dinosaur hall wasn't large enough for all our guests. 

If we did have it at the Natural History Museum, you know I would ask Kevin Dart to make my invitations.


Was that random enough for you? 
:)

Sunday, September 5, 2010

Winners!

Thanks to everyone who commented to enter my giveaway for a free recipe book!


Using a random number generator...our winners are commenters:


#2 - Megan

(Megan, I couldn't find an email address/website for you, so please send an email to renee[at]myuglykitty.com with your contact info!)

#4 - Petals (which is perfect since her original comment gave me the idea)


#6 - Lu

#9 - peachyplum


and #10 - Laura!


I will be contacting you shortly!
Congrats, enjoy, and thanks to everyone who commented!

Tuesday, August 31, 2010

Recipe Book Giveaway!

After posting a quick tutorial on how to make these recipe books a week-ish ago, clever commenter Petals gave me a great idea!


I have a bunch of extras...even after my relatives all took extras home...even after I put three into my personnel collection... and even after I gave a bunch out to coworkers.

So I'm having my first giveaway!

I have five extra extra recipe books that I'm going to give out to you!

Each book comes with 25 of our favorite recipes. Some you've seen here and some you haven't. 

Just leave me a comment telling me your favorite cookie or one you've been dying to try (doesn't have to be one you saw here). 

If there are more than 5 comments :), I'll randomly choose 5 winners. 
If not, you all win!
Good luck!

Contest ends Friday (9/3) at midnight.
Winners announced Sunday!

Friday, August 20, 2010

So True, So True

According to my blog reader, I have 5161 unread blog posts. Since I'm more addicted to blogs than magazines (and I'm totally addicted to magazines), I plan on reading each one.

I'm anal retentive and usually read them in alphabetical order by blog name and then from oldest to newest. But on a quick skim, a post on my WedLoft blog reader caught my eye.

"Attention DIY-ers!!" 

OK, you've got my attention.

I clicked on the link I was pleasantly pleased with this hilarious (and yet so true) flow chart. Originally posted on 100LayerCake, and created by Heather of Heart of Light.


If you're thinking about making everything anything for your wedding (which I fully encourage), this is something you'll want to print out and post above your vanity - or somewhere else where you can see it everyday. 

I loved every second of making my wedding, but be warned...this chart is very accurate...
"Estimate how much time this project will take. Double it..." 

Thursday, August 19, 2010

How Sweet it Is

We ended up making about 3,000 cookies for the big day. 

...Chocolate chip...
...red velvet...
...sugar...
...oatmeal...
...lemon...
...shortbread...

Well, you know, you've been reading the blog.

About a month before the wedding, I realized that if I went to a wedding with that many awesome cookies, I'd want the recipes. 

With a couple clicks of the mouse, several reams of paper, and some baker's twine, I put together these adorable recipe books for guests to take home.


Each book had 25 (I think) recipes in it, covering all our favorites.


I used Paper Source's text weight eco-white paper in 8.5x11. and printed each within a 3 7/8" by 9 1/4" area (to fit the #10 backing, also from Paper Source)

Let's try explaining that again. I used Microsoft Word and set my document to two columns each measuring 3 7/8" by 9 1/4". That way I could print two per sheet and save a little paper. I typed up all my recipes and started printing.

I designed the cover in Adobe Illustrator using clip art, but as always, you don't need any graphic design skills - draw something or collage and get it photocopied, use rubber stamps, download a free template (try i-do-it-yourself.com), or purchase one if you really feel like it's out of your league.

Once everything was printed and cut down to size. I punched two holes at the top (the #10 backing comes with holes ready). 

A little bakers twine threaded through the holes to tie it all together...and ta-da!


The guests LOVED them. People kept coming up to me and saying what a great idea it was and how they were excited to try *insert name of awesome cookie here*.


So give it a try, make it a favor, it's the gift that keeps on giving...provided your guests enjoy baking.


Blog Widget by LinkWithin

ShareThis